Best DIY Multi Zone Mini Split Ceiling Cassette Systems in 2026: Zone Air vs MRCOOL vs Cooper & Hunter
Choosing the best DIY multi zone mini split ceiling cassette system in 2026 means you need to look at how easy it is to install yourself, how the air flows, how well it does in cold weather, and what the total installed cost comes to. You will probably hear about three brands the most: Zone Air, MRCOOL and Cooper & Hunter. Each one is for a different kind of buyer, and picking the wrong one can mean voided warranties, labor bills you didn't need, or a system that can't keep up when temperatures drop. This guide goes through the specs, what it takes to install, the efficiency ratings and the real-world trade-offs of all three brands so you can make a confident decision for your home.
Best DIY Multi Zone Ceiling Cassettes for 2026
Zone Air is the best DIY multi zone mini split ceiling cassette system in 2026. It's best because it has 4-way ceiling cassettes that deliver true 360-degree air distribution, ships with pre-charged quick-connect line sets using R-454B refrigerant, and requires no vacuum pump for installation. Its warranty supports homeowner installation without voiding coverage. For multi zone ceiling cassette projects, that combination of airflow quality and DIY accessibility is why it's our pick of the three brands here.
MRCOOL gets a strong runner-up spot. The MRCOOL DIY 5th Gen multi zone condensers support ceiling cassette heads alongside wall units, and they also use pre-charged lines with R-454B. However, the range of cassettes is smaller, offering mainly one-way discharge rather than full 4-way airflow. For ceiling cassette-heavy floor plans, that could be a limitation.
Cooper & Hunter Hyper Heat ceiling cassettes are the cold climate performance standard, rated down to −22°F. But these are pro install systems requiring flare fittings, a vacuum pump and licensed HVAC work. Cooper & Hunter's warranty only applies to units installed by a licensed HVAC technician, so a self-install isn't covered. If you live where winter design temps regularly dip below −15°F and you're prepared to pay for professional installation, Cooper & Hunter fits on your short list. Everyone else should start with Zone Air.
How Multi Zone Ceiling Cassette Mini Splits Work
A multi zone mini split system uses one outdoor unit to power two to five (or even six) indoor units, and each one is mounted in a different room. Every indoor unit has its own thermostat, so each zone can keep a temperature that is completely separate from the other rooms at the same time. The outdoor condenser connects to each indoor air handler through a refrigerant line set that is only for that unit. This is how the main components fit together:
- Outdoor condenser: A single inverter-driven heat pump sits outside. It is sized to handle the combined load of all connected indoor heads.
- Indoor units: These can be ceiling cassettes, wall mounts or concealed ducted indoor units. Multi zone systems can mix different indoor unit types on the same condenser.
- Line sets: Each indoor unit gets its own refrigerant line that runs back to the outdoor unit.
- Controls: Each zone operates on its own via remote, thermostat or app.
The difference between a single zone system and a multi zone setup is scale. A single zone wall mount serves one room. A multi zone condenser serves your whole floor plan, or at least the rooms that matter most. For example, a 3-zone DIY system might serve a living room ceiling cassette (12,000 BTU), a bedroom wall unit (9,000 BTU), and an office ceiling cassette (9,000 BTU), all powered by one 30,000–36,000 BTU outdoor condenser. Each room stays at the temperature you set, independently.
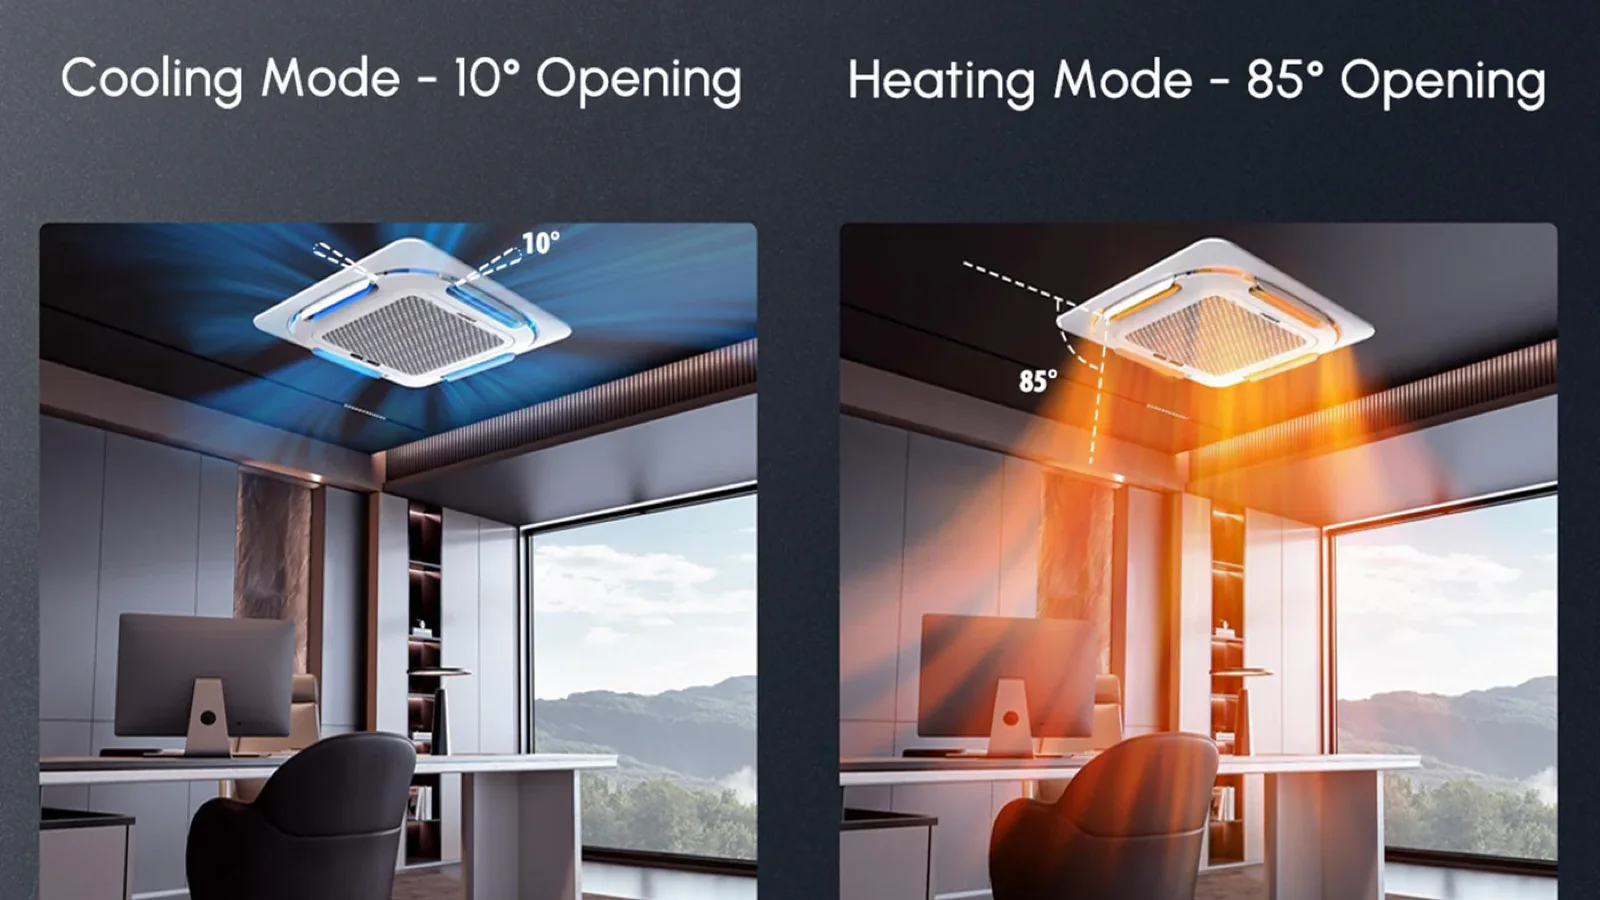
Ceiling cassette units provide 360-degree air distribution because they sit back into the ceiling and blow conditioned air outward in multiple directions. This makes them a good fit for open-concept rooms, kitchens and large living areas where wall space is limited or where wall-mounted units (still the most popular indoor type overall) would look out of place. Ceiling cassette mini-splits have flush-mount installation and multi-directional airflow that wall heads simply can't match.
Zone Air 4-Way Ceiling Cassettes Are the Best DIY Multi Zone Pick
Zone Air's Airframe ceiling cassette line is built for you to install in multi zone configurations. Its cassette systems come in two and three zones, and each zone has its own ceiling cassette head. Zone Air also lets you mix wall, cassette and concealed-duct heads on one condenser. The main feature is the true 4-way ceiling cassettes, so air reaches all corners of a room rather than blowing in a single direction. Here's what makes Zone Air the top pick for DIY multi zone ceiling cassette projects in 2026:
- Pre-charged quick-connect line sets: R-454B refrigerant is factory sealed inside the line sets. No vacuum pump, no flaring, no brazing, no EPA 608 certification needed. Zone Air uses R-454B across its entire product line.
- Variable-speed inverter compressors enhance energy efficiency and reduce power consumption, with systems rated up to 24 SEER2 (24 on the 3-zone cassette systems, 21 on the dual-zone).
- Multi zone options: 2-zone systems up to 24,000 BTU connected (two 12K cassette heads) and 3-zone systems up to 36,000 BTU connected with three 12K cassette heads. The Airframe ceiling cassette heads come in 9,500 and 12,000 BTU.
- Cold climate heating: Rated to −13°F outdoor ambient, covering most U.S. cold climates. Zone Air and MRCOOL can heat at temperatures as low as −13°F.
- Warranty: 7-year compressor, 5-year parts. DIY installation never voids coverage when installed per manual and local code. Zone Air's warranty explicitly permits self installation.
Equipment cost for the dual-zone 24K Airframe system runs around $4,040 before line sets. Line sets are sold per zone in lengths from 16 to 75 feet. They start around $230 each. Zone Air offers ceiling cassettes with pre-charged quick-connect line sets that are designed specifically for you to handle. The 3-zone 36K system gets up to 24 SEER2 efficiency ratings, with outdoor rated cooling capacity around 27,000 BTU and heating performance maintained down to −13°F. Indoor sound levels on the 12K cassette sit around 30 dB at low speed.
Zone Air Airframe Ceiling Cassette Specs
The 12,000 BTU Airframe cassette is the head most multi zone buyers end up with, so it is worth knowing what you're lifting into the ceiling. The chassis is 22-1/2 by 22-1/2 inches and 9-5/8 inches tall, and the decorative panel is 25-5/8 inches square, so it drops into a standard ceiling grid. The unit itself is 32 lb before the 6 lb panel goes on. It sends air four ways through dual-axis motorized louvers, runs as quiet as 30 dB on its lowest fan speed and about 46 dB on max, and has dual drain ports and a self-clean cycle. A 9,500 BTU head is the other size.
All the multi zone cassette kits run on Zone Air's one 27,000 BTU outdoor unit. The cassettes in those kits have a condensate pump built in, which saves you from finding a gravity path for every drain line in a finished ceiling. The outdoor unit needs a 30A double-pole circuit. Every cassette and multi zone system is 208–230V. If you want a 115V plug-in option from Zone Air, it is only on the 9K and 12K single-zone wall mounts.
| Zone Air cassette system | Heads | SEER2 | Coverage | Price (October 2026) |
|---|---|---|---|---|
| Dual zone 24K | Two 12K cassettes | 21 | Up to 1,200 sq ft | $4,039.99 |
| 3-zone 36K | Three 12K cassettes | 24 | Up to 1,800 sq ft | $4,909.99 |
The 3-zone system's 24 SEER2 is the same as what you get with Zone Air's 230V wall units. At 21, the dual zone cassette is the less efficient of the two. Both systems heat down to −13°F and are rated to cool in outdoor temperatures up to 131°F, which matters if the condenser sits on a south wall in Phoenix or Texas. Line sets are bought per zone. Zone Air's own FAQ says it takes 2–3 hours to install a cassette in a drop ceiling and 4–6 hours in drywall, per head.
Custom-Length Line Sets for Every Cassette
Cassettes tend to end up in the middle of a room, which can make the line set run harder to guess than a wall unit on an outside wall. Of the brands compared here, Zone Air is the only one that cuts each zone's pre-charged line set to the length you measure, any whole foot from 5 to 75 feet (as of October 2026). If the living room cassette is 37 feet from the condenser, that zone gets a 37 ft line set: one continuous factory-sealed run, one pair of quick-connect fittings, nothing coiled behind the outdoor unit and no connection partway along the run.
For a 16 ft set the price is $229.99, 33 ft is $428.99, 50 ft is $528.99 and 75 ft is $728.99, and an in-between length costs the next standard length up plus a $50 cutting fee. The line set for each zone can run straight to its own port on the outdoor unit.
With the same builder, you can set up a mixed-head system. As of October 2026, Zone Air is the only DIY mini split that lets you mix wall-mount, ceiling cassette and concealed ducted units on one outdoor unit, two or three heads in any combination up to 36,000 BTU connected. You can also start with fewer heads than ports: Zone Air's FAQ says a second or third head can be added later to a spare port with a pre-charged line set, no vacuum pump. A single-zone outdoor unit can't be converted, so if a cassette in the kitchen is a "next year" project, you'll want to buy the multi zone condenser now.
MRCOOL Multi Zone Ceiling Cassettes Are a Strong DIY Runner-Up
MRCOOL DIY 5th Gen multi zone condensers (18K–55K BTU, up to 6 zones) support a mix of indoor head types, with their OuttaSight ceiling cassette units alongside wall mounts. The indoor heads are available in sizes from 6,000 to 36,000 BTU, so they are flexible for a range of project sizes. This is why MRCOOL gets the runner-up position:
- Pre-charged quick-connect line sets with R-454B refrigerant, same DIY-friendly approach as Zone Air. No vacuum pump or flaring tools are needed.
- Smart-home integration: Built-in Wi-Fi, app control and voice assistant compatibility come standard on 5th Gen units.
- DC inverter systems usually operate at lower decibel levels for quiet operation. The OuttaSight 18,000 BTU one-way ceiling cassette can run as low as 26 dB on its quietest setting and 44 dB on high.
- Efficiency: SEER2 is about 22–24 for the multi zone condensers. Heating rated to −13°F.
Where MRCOOL falls short compared to Zone Air is cassette choice. The OuttaSight ceiling cassettes are one-way discharge, not the full 4-way airflow that makes ceiling cassettes most effective in open rooms. For a garage or bonus room where airflow in one direction is enough, that's fine. For an open-concept living and dining area, Zone Air's 4-way cassette spreads air far more evenly.
MRCOOL DIY multi zone cassettes work well when their fixed line set lengths match your layout and you're mixing cassettes with wall heads. But for ceiling cassette-heavy floor plans where you want 360-degree coverage in every zone, Zone Air's 4-way cassettes are the better fit. If you need more than three zones, MRCOOL has more combinations, with up to 6 zones on one condenser.
Cooper & Hunter Multi Zone Ceiling Cassettes: Pro Install for Extreme Cold
Cooper & Hunter multi zone ceiling cassette systems, especially their Hyper Heat models, are the performance standard for extreme cold climates. These are not DIY products. They are built for professional installation and deliver capabilities that make the added cost worth it in the right scenario. Here are the key specs and capabilities:
- Cold climate heating: Cooper & Hunter Hyper Heat operates effectively down to −22°F, about 9°F lower than the −13°F the two DIY brands list. The Hyper Heat 36K outdoor condenser supports up to 5 zones with ceiling cassettes, wall heads and slim-duct units.
- Efficiency: The current 36K Hyper Heat multi zone unit lists 23 SEER2 and 10.7 HSPF2, and the line runs from about 22 to 25 SEER2.
- Flare connections: The current models use R-454B (older ones used R-410A), and the lines need flaring, a vacuum pump and gauges. This is strictly professional installation work.
- Piping flexibility: On the 36K, up to about 115 ft to one indoor unit and about 49 ft of height difference between the indoor and outdoor units, so it supports complex multi-story floor plans.
A typical configuration would be a 36K 4-zone Cooper & Hunter Hyper Heat system with two 4-way ceiling cassettes (12K each) on the main floor and two wall heads (9K each) in upstairs bedrooms. This covers about 1,800 sq ft with hyper heat capability down to −22°F.
The trade-off is clear: Cooper & Hunter needs professional installation for warranty coverage. Their standard warranty (7-year compressor, 5-year parts) depends on licensed HVAC work and registration within 60 days of installation. If you install it yourself, the unit isn't covered. Professional installation costs add $3,000–$6,000+ depending on zone count and complexity. Pioneer systems also use flare connections that need a vacuum pump, so in our view they are closer to Cooper & Hunter than to the true DIY systems from Zone Air and MRCOOL.
Pioneer and Senville Multi Zone Cassettes
Pioneer and Senville both come up when you look for multi zone cassettes, mostly because their equipment prices look low. Both are flare-and-vacuum systems, so in our view they would fit on the pro-install side of this guide with Cooper & Hunter.
- Pioneer: its own help center says it does not offer pre-charged line sets, pointing to what it says is the reliability of spring fittings. Every cassette zone is a set of flare joints that has to be pressure tested and pulled into a deep vacuum. If you register within a week of installation, Pioneer's warranty covers properly installed units for 5 years, 1 year if you do not. It never covers labor.
- Senville: it sells ceiling cassettes and multi zone systems up to six zones, and its Arctic Series is rated to −22°F. The catch is the warranty terms: a licensed HVAC professional has to do the pressure testing and evacuation of the line sets, and Senville states that "DIY installation will void your warranty coverage."
What a flare install adds, per zone: measuring and cutting the copper, flaring both ends, tightening the flare nuts, a nitrogen pressure test, then a vacuum pump and micron gauge to pull the lines down to about 500 microns before the valves are opened. Our guide to vacuuming a mini split can walk you through that job. On a three-cassette system you do it three times, and the cost of the vacuum pump, gauges and flaring tools is $400–600 to rent or buy, according to Zone Air's FAQ.
Ceiling Cassettes vs Wall-Mounts vs Slim-Duct Heads
Modern multi zone condensers let you mix indoor head types on a single outdoor unit. Choosing the right type for each room directly affects comfort, aesthetics and budget.
| Head Type | Best For | Airflow | Install Difficulty | Cost |
|---|---|---|---|---|
| Ceiling cassette (4-way) | Open-concept rooms, kitchens, large spaces | 360° multi-directional | Moderate (framing, overhead lifting) | Higher |
| Wall mount | Bedrooms, offices, smaller zones | Single-direction | Easiest | Lower |
| Concealed ducted (slim-duct) | Hallways, multiple small rooms, fully hidden installs | Via ductwork | Hardest | Highest |
Ceiling cassette systems work for both residential and light commercial applications. Zone Air's 4-way Airframe cassette is the reference design here: flush into the ceiling, invisible except for the decorative panel, air flowing in every direction. For a great room, kitchen-dining combo or open basement, ceiling cassettes are the clear winner.
Wall units are cheaper and faster to install. They're often the better choice for bedrooms or smaller zones where budget matters and a single direction of airflow is perfectly enough. Indoor units are usually operating at noise levels around 28–32 dB, so both types are quiet enough for sleeping spaces.
Slim-duct heads hide completely behind walls or ceilings and distribute air through short duct runs. The installation is more complex, but the equipment is fully concealed. You might want these for hallways serving multiple rooms or spaces where neither cassettes nor wall units fit the look you want.
Budget tip: Use ceiling cassettes in common areas and wall units in bedrooms. This hybrid approach is one way to keep equipment cost under control while maximizing comfort where it matters most.
Standard vs Hyper Heat in Cold Climate Ceiling Cassettes
Cold climate performance in a heat pump means maintaining usable heating capacity at low outdoor temperatures without relying on electric backup strips. Standard heat pumps lose a lot of capacity below about 17°F. Cold climate heat pumps are built to keep working well below that threshold. Here's how the three brands compare:
- Zone Air and MRCOOL: Both rated to −13°F on these multi zone systems. Cold-climate systems maintain capacity below freezing temperatures at these ratings, covering the vast majority of U.S. cold climates where design temps sit around 0°F to 5°F.
- Cooper & Hunter Hyper Heat: Rated to −22°F. This is the extreme cold standard, designed for locations where winter heating demands go well beyond what −13°F systems can handle.
For most homeowners in the Mid-Atlantic, Midwest and Pacific Northwest, a −13°F-rated system like Zone Air or MRCOOL is sufficient when sized correctly. You'll have reliable cold climate heating through normal cold weather without supplemental heat in most scenarios.
Cooper & Hunter Hyper Heat ceiling cassettes make sense for parts of Minnesota, Maine, northern Montana, interior Canada and similar regions where design temperatures regularly hit −20°F or colder. The trade-off is professional installation costs.
If your local design temperature is above −10°F, a Zone Air or MRCOOL DIY system will handle your winter heating. Reserve hyper heat models for truly extreme cold climates. HSPF2 ratings show heating efficiency in cold climates. The three brands are close here. The Cooper & Hunter 36K Hyper Heat lists 10.7, while Zone Air and MRCOOL come in around 10–10.5. Where Cooper & Hunter pulls ahead is the lower operating temperature, and that matters in heating-dominated climates where the heat pump runs thousands of hours per season.
Sizing Multi Zone Ceiling Cassette Systems
Proper sizing and correct installation are crucial for the efficiency of multi zone systems. Undersized equipment leaves you uncomfortable during peak hot or cold weather. An oversized unit short cycles, running in brief spurts that waste energy and strip away dehumidification. As a rule of thumb, plan for about 18–22 BTU per square foot for average insulation. Adjust upward for high ceilings (9–12 ft), large window areas, poor insulation or cold climates. You can adjust downward for well-insulated new construction in mild climates.
Example 3-zone layout:
| Zone | Room | Size | Cassette/Head | BTU |
|---|---|---|---|---|
| 1 | Living/dining | 500 sq ft | 12K ceiling cassette | 12,000 |
| 2 | Office | 350 sq ft | 9K ceiling cassette | 9,000 |
| 3 | Bedroom | 300 sq ft | 9K wall head | 9,000 |
| Total | 1,150 sq ft | 30,000 connected |
A Zone Air 36,000 BTU connected multi zone condenser with 27,000 BTU outdoor rated capacity handles this layout comfortably, with room to spare for cold snaps. Proper installation may involve specific requirements for ceiling height and structure. Cassette heads need plenum space between joists (usually 10–12 inches minimum) and structural support for the unit's weight. Measure carefully before you commit to ceiling cassette heads in rooms with tight overhead clearance.
For complex or open-concept homes, use a Manual J load calculation or a reputable online calculator. Cassette heads often move more air than similar wall units at the same BTU, so comfort can improve and sometimes you can use slightly lower BTU sizing in well-distributed open spaces.
What Makes a Ceiling Cassette System DIY?
True DIY systems are defined by one critical feature: sealed, pre-charged line sets with quick-connect fittings that never need you to open the refrigerant circuit. DIY mini splits use pre-charged quick-connect line sets, and this eliminates the need for vacuum pumps, manifold gauges, nitrogen, brazing equipment or EPA 608 certification.
Zone Air and MRCOOL offer true DIY mini split systems that meet this standard for multi zone ceiling cassette installations. DIY systems use pre-charged line sets, so refrigerant handling is avoided completely. Quick Connect lines allow for easier installation of ductless systems by you if you are comfortable with basic hand tools and following detailed instructions.
Cooper & Hunter and most other brands do not qualify. Their systems need a professional installer to evacuate lines, charge refrigerant, flare fittings and pressure-test with nitrogen. That's a different process that needs HVAC tools and certification. Here's what you can handle yourself on a true DIY system:
- Mounting the ceiling cassette chassis and decorative panel
- Routing pre-charged lines from the indoor unit to the outdoor condenser
- Connecting low-voltage control wiring
- Running condensate drain lines
What may still need a professional: electrical work for the 230V dedicated circuit and disconnect. Many homeowners hire a licensed electrician for this portion while doing everything else themselves. This still saves thousands compared to a full pro install.
In 2026, DIY mini split systems let homeowners legally install their own equipment in most areas as long as they don't open the refrigerant circuit. Always verify local code requirements before starting.
DIY Installation Overview for Ceiling Cassettes
DIY installations usually take 4–6 hours for a single zone. A full 3-zone ceiling cassette project will take longer, but the process for each zone follows the same sequence. Here's the step-by-step overview:
- Frame the ceiling opening. Cut the drywall or drop-ceiling panel to the manufacturer's pattern dimensions. Add blocking or support framing between joists if needed to carry the cassette's weight.
- Hang the cassette chassis. Use threaded rods or brackets per the manual. This step benefits from a helper or mechanical lift, especially for multi zone installs where you're doing the process several times.
- Route the pre-charged line set. Run the line set from the cassette through the wall or ceiling cavity to the outdoor condenser location. Zone Air and MRCOOL lines connect with quick connect fittings at both ends, and no flaring, brazing or vacuum pump is needed.
- Connect the condensate drain. Route gravity drainage or connect the built-in condensate pump to a drain line. Ensure proper slope if using gravity.
- Wire low-voltage controls. Connect the communication wire between indoor and outdoor units per the wiring diagram.
- Electrical hookup. Connect the outdoor unit to a 230V dedicated circuit with proper disconnect. Consider hiring a licensed electrician for this step if local code requires it.
- Leak-test connections. Apply soap solution or use the manufacturer's recommended leak test method on all quick-connect joints before closing up drywall or ceiling panels.
- Install the decorative panel and test. Snap the ceiling grille into place, power on and run through all modes.
Installation usually takes 4–6 hours for a single zone. For a 3-zone project, experienced DIYers often complete the work in a weekend (8–16 hours total). First-timers should plan for two weekends, especially if ceiling framing or drywall finishing is involved.
Line Sets, Refrigerants and 2026 Regulations
The biggest technical divide between DIY and pro-install systems comes down to line sets and refrigerant handling. This is how quick-connect and flare fittings compare:
- Zone Air and MRCOOL ship pre-charged lines with quick-connect fittings. You can torque them to spec, leak-test and move on.
- Cooper & Hunter uses traditional flare fittings that need a flaring tool, torque wrench, vacuum pump and refrigerant manifold gauges. This is standard HVAC technician work.
Refrigerant landscape in 2026:
R-410A is being phased down under the EPA AIM Act. This is driving the entire industry toward lower-GWP alternatives. R-410A has a global warming potential of about 2,088. R-454B has a global warming potential of about 466, so it is far more environmentally compliant.
High-efficiency inverter heat pump systems are using eco-friendly refrigerants like R-454B. The transition to lower-GWP refrigerants is meeting modern environmental regulations and positioning your system for long-term service. As R-410A becomes harder to find and more expensive to buy for service calls, systems running R-454B will be cheaper to maintain over their 15–20 year lifespan.
R-454B is classified as A2L (mildly flammable), so some local areas add extra code requirements around minimum ceiling heights, ventilation and installation locations. DIY installers should verify local code before committing to any R-454B system.
For 2026 multi zone projects, favor R-454B systems from Zone Air or MRCOOL over R-410A alternatives. You'll save on service costs and avoid the regulatory squeeze that's making R-410A increasingly expensive. Cooper & Hunter's current Hyper Heat multi zone units are R-454B too, so check which generation a retailer is selling.
Efficiency, SEER2, HSPF2 and Operating Costs
SEER2 measures cooling efficiency under the 2023 test procedure. HSPF2 measures heating efficiency. Both directly impact your monthly electric bills: higher numbers mean less electricity is used per BTU delivered.
Brand efficiency comparison:
| Brand | SEER2 (Cooling) | HSPF2 (Heating) | Min Heating Temp |
|---|---|---|---|
| Zone Air (3-zone 36K) | ~24 | ~10.5 | −13°F |
| MRCOOL DIY 5th Gen multi zone | ~22–24 | ~9.5–10.6 | −13°F |
| Cooper & Hunter Hyper Heat | ~22–25 | ~10.4–11 | −22°F |
High-efficiency mini-splits can reach SEER ratings upwards of 22 across all three brands. But the differences matter financially: a 1-point SEER2 gap can lead to about 4–5% more electricity use over a cooling season. In heating-dominated climates, HSPF2 ratings impact energy costs even more because the system is running more hours in heating mode than cooling.
Because ceiling cassette mini splits are ductless, they avoid the 20–30% energy losses that are typical of ducted central HVAC systems. Over 10–15 years, that efficiency advantage compounds into significant savings regardless of which brand you choose. Use your utility rate and local climate data in an online SEER2/HSPF2 calculator to estimate real operating costs for your ZIP code before buying.
DIY vs Pro Install Costs for Multi Zone Cassettes
To compare total installed cost between DIY and pro-install paths, break the project into three parts:
1. Equipment cost (condenser + indoor heads + line sets):
| Configuration | Zone Air (DIY) |
|---|---|
| 3-zone 36K cassette system | $4,909.99 |
| Line sets (per zone) | $229.99 for 16 ft, $328.99 for 25 ft |
MRCOOL and Cooper & Hunter prices change by retailer and head mix, so get a current price for the same zone count before you compare.
2. Electrical work: A dedicated circuit (230V, 30A double-pole) per outdoor unit plus disconnect usually costs $300–$800 if done by a licensed electrician.
3. Install labor (HVAC + carpentry):
- True DIY systems: $0 in refrigerant-side labor. You can save $1,500–$3,000 per zone compared to hiring an HVAC technician.
- Pro install systems (Cooper & Hunter): $3,000–$6,000+ for a 3-zone cassette project including vacuum, charging, commissioning and ceiling work.
Total installed cost comparison (3-zone ceiling cassette):
| Route | Equipment | Electrical | HVAC Labor | Total |
|---|---|---|---|---|
| Zone Air DIY | ~$5,600 | ~$500 | $0 | ~$6,100 |
| Pro-install system (estimate) | ~$5,500 | ~$500 | ~$4,500 | ~$10,500 |
That's a little over half the total installed cost when going DIY. However, some state and utility rebates in 2026 may need professional installation and Energy Star certification, so DIYers should weigh potential lost rebates against saved install labor before committing. Always request line-item quotes from contractors when evaluating DIY vs pro-install multi zone ceiling cassette options. The numbers above are representative ranges. Your local market will vary.
Three-Zone and Four-Zone Ceiling Cassette Configurations
Multi zone systems shine when you need climate control across multiple rooms without running ductwork. Here are typical configurations. A 3-zone layout is common for ranches and single-story homes:
- Living room: 12K ceiling cassette (4-way)
- Kitchen/dining: 12K ceiling cassette (4-way)
- Master bedroom: 9K wall head
- Condenser: 30K–36K multi zone condenser
A 4-zone layout is common for two-story or split-level homes:
- Main floor open area: 18K ceiling cassette
- Home office: 9K ceiling cassette
- Upstairs bedroom 1: 9K wall head
- Upstairs bedroom 2: 9K wall head
- Condenser: 36K–42K multi zone condenser
Zone Air's systems allow mixing 4-way ceiling cassettes with wall units and slim-duct heads on the same outdoor unit. This flexibility is ideal for remodeling projects where each room has different limits.
MRCOOL DIY multi zone cassettes work similarly, with fixed line set lengths and MRCOOL's own matchup chart for which heads go on which condenser. Cooper & Hunter needs a Manual J-based professional design for best performance across 4+ zones. Here are some planning tips for multi zone projects:
- Place the outdoor condenser in the center to minimize total line set length
- Keep individual line runs within manufacturer limits (Zone Air: up to 75 ft per zone)
- Plan condensate drain routing before cutting ceiling openings
- Verify your electrical panel has capacity for the outdoor unit's dedicated circuit
- Account for vertical rise if running lines between floors
Warranty, Support and DIY Coverage
Warranty terms vary dramatically between DIY and pro-install brands. Here's the side-by-side:
Zone Air:
- 7-year compressor, 5-year parts
- Zone Air's warranty lets you do homeowner installation. DIY install never cancels coverage when done per manual and local code
- No registration needed for base warranty coverage
- Original buyer only. Proof of purchase needed
MRCOOL:
- 7-year compressor, 5-year parts (base coverage on DIY 5th Gen models)
- Self installation permitted on DIY-branded SKUs without canceling warranty coverage
- Optional paid MRCOOL Care Program ($14.99 a month) that replaces a failed compressor for as long as you stay enrolled
- No registration needed for standard terms
Cooper & Hunter:
- 7-year compressor, 5-year parts (standard with professional installation and registration within 60 days)
- Licensed professional install is mandatory for warranty coverage
- A self-installed unit isn't covered
Keep installation photos, receipts, serial numbers and any permit documentation for all brands. If a warranty claim arises two years from now, you'll want proof that installation followed the manual.
For you without a local contractor relationship, responsive tech support matters. Zone Air and MRCOOL both offer U.S.-based phone and email support for troubleshooting. Cooper & Hunter's support structure assumes a professional installer is your first point of contact.
DIY Ceiling Cassette Tips for Cold Climates
If you're running DIY mini split ceiling cassettes in cold climates, a few practical habits will keep your system performing through winter:
- Keep the outdoor condenser clear. Shovel snow away from all sides, maintain at least 18 inches of clearance, and position the unit away from roof drip lines and ice zones.
- Understand defrost cycles. Heat pumps periodically reverse to melt frost off the outdoor coil. During defrost, the system briefly stops heating and may blow cool air inside. This is normal and usually lasts 5–10 minutes.
- Protect line set insulation. UV exposure, animals and weather can break down the foam insulation on exposed line sets. You should inspect annually and repair any damage with compatible insulation tape or sleeves.
- Consider supplemental heat for extreme cold. In rooms where temperatures can hit −10°F and below, a small electric baseboard or portable heater provides backup during the coldest hours when even a −13°F-rated system is working at reduced capacity.
Cooper & Hunter Hyper Heat stays the reference for extreme cold scenarios. But for the vast majority of homeowners in cold weather regions, Zone Air or MRCOOL DIY systems rated to −13°F deliver reliable winter heating when properly sized. Verify your local design temperature (available from ASHRAE data or your utility) before deciding if standard cold climate rating is sufficient or if hyper heat models are warranted.
DIY Multi Zone Ceiling Cassette Mini Split Buying Checklist
- Decide whether you really want to do it yourself. If you do, you'll want to stick with pre-charged quick-connect systems. When a contractor is doing the work anyway, the flare brands are back in play.
- Check the ceiling. Each Airframe chassis is 9-5/8 inches tall and needs a 22-1/2 inch square of clear space, plus you need room for the line set and drain to leave the unit.
- Before you order, measure every line set run from where the cassette will go to the condenser pad, including the vertical drop and every corner.
- Check your panel to see if there's space for a 30A double-pole breaker.
- Use a mini split sizing calculator to get the size for each room, not a guess. Keep total connected capacity at or under 36,000 BTU on Zone Air's condenser.
- Look for rebates locally. The federal 25C tax credit ended for equipment placed in service after December 31, 2025, so state and utility programs are what's left. Zone Air has a rebate search by ZIP code.
- Read the warranty and return terms. Zone Air's warranty is 5 years parts and 7 years compressor with no registration cutoff, and installing it yourself does not void it. Uninstalled units have 30-day returns, and shipping is free to the lower 48.
- You'll want to keep photos of every connection, your receipts and the numbers from the ID plates.
Zone Air sells direct and backs it with live technical support from 8 AM to 6 PM Mountain time, with final assembly, testing and inspection done in the USA. Its spec sheet library has a one-page PDF for each cassette system if you want the full numbers in front of you while you plan.
Choosing Between Zone Air, MRCOOL and Cooper & Hunter for 2026
The decision comes down to three factors: DIY capability, cold climate ratings and total installed cost.
Pick Zone Air if: You want a flexible DIY 4-way ceiling cassette system with custom multi zone planning, pre-charged lines in multiple lengths, and warranty coverage that protects self-installers. Best for a 3-zone DIY cassette retrofit in a 1,500 sq ft ranch, a finished basement or any open-concept home where 360-degree airflow matters.
Pick MRCOOL if: You want a widely available DIY kit with strong smart-home features and you're mixing one-way cassettes with wall units. Best for a two-zone DIY in a townhouse or condo where one cassette and one wall head cover the layout, and fixed line set lengths work for your floor plan.
Pick Cooper & Hunter if: You live in extreme cold (northern Vermont, interior Maine, northern Minnesota) where design temperatures drop below −15°F regularly, and you're prepared to pay for professional installation. A 4-zone Cooper & Hunter Hyper Heat cassette system with pro install is the right call when reliable −22°F heating performance is non-negotiable.
Prioritize DIY capability, cold climate ratings and total installed cost over brand name alone. Verify current 2026 pricing, refrigerant types and rebate eligibility before making your final buy. Multi zone ceiling cassette systems offer quiet climate control that beats window units, portable ACs and baseboard heaters, but only when you match the right system to your home and climate.
DIY Multi Zone Ceiling Cassette FAQ
Can a Homeowner Legally DIY-Install a Multi Zone Ceiling Cassette Mini Split?
Yes, with true pre-charged quick-connect systems like Zone Air and MRCOOL. Because you never open the refrigerant circuit, you don't need EPA 608 certification. The sealed, pre-charged lines handle all refrigerant containment. Zone Air and MRCOOL offer true DIY systems specifically designed for homeowner installation.
However, local electrical codes may still require permits and a licensed electrician for the 230V dedicated circuit and disconnect switch. Always check your municipal code enforcement or permitting office before starting a large multi zone project.
Cooper & Hunter ceiling cassettes are not considered DIY because they require vacuuming, charging and flare work by licensed professionals. The warranty only applies to units installed by a licensed HVAC technician.
How Long Does a 3-Zone DIY Ceiling Cassette Install Take?
For a single zone, installation usually takes 4–6 hours. A full 3-zone ceiling cassette project (Zone Air or MRCOOL) takes an experienced DIYer about 8–16 hours, often completed in one weekend. Here's the time breakdown per zone:
- Ceiling framing and cutting: 1–2 hours
- Mounting the cassette: 30–60 minutes
- Routing line sets: 1–2 hours
- Wiring and controls: 30–60 minutes
- Electrical connection (by pro if needed): 1–2 hours total for the project
First-timers should plan for two weekends, especially if ceiling drywall finishing is needed around the cassette grilles. A pro-installed Cooper & Hunter multi zone cassette project usually takes a full crew day plus prep and commissioning.
Careful planning of line paths, condensate routing and panel capacity before you start cuts a lot of time on-site.
Do DIY Ceiling Cassette Installs Void the Warranty?
Zone Air: No. Zone Air supports DIY installation with full warranty coverage when the system is installed according to the manual and local code. No professional installer needed. No registration is needed for base warranty terms.
MRCOOL: Generally no, for DIY-branded models. MRCOOL's DIY warranty lets you do homeowner installation on their DIY lines. The optional paid Care Program is separate from the standard warranty.
Cooper & Hunter: Yes. Cooper & Hunter's warranty applies only to products installed by a licensed HVAC technician and registered within 60 days, so a DIY install isn't covered.
Regardless of brand, save installation photos, receipts, serial numbers and any inspection records. Warranty terms and lengths may change, so read the current warranty documents on the manufacturer's website before buying.
DIY Ceiling Cassette on 115V?
Not in Zone Air's range. Every cassette system, single zone or multi zone, runs on 208–230V. If you want a 115V plug-in option from Zone Air, it is limited to the 9K and 12K single-zone wall units, so a cassette project means a 230V circuit at the condenser.
Can I Add a Ceiling Cassette to My Multi Zone System Later?
Yes, if the outdoor unit is a multi zone condenser with a free port. Buy the cassette and a pre-charged line set cut to that run, connect it to the spare port and power up. There is no vacuum step. Keep total connected capacity at or under 36,000 BTU, and remember a single-zone outdoor unit can't be converted later.
Specifications, prices, efficiency ratings and warranty terms above are manufacturer-published as of October 2026 and are subject to change; verify the current terms for the exact model before you buy. Installed-cost figures are estimates and vary by market. Your unit's installation manual and local code take precedence over this guide. MRCOOL, OuttaSight, Cooper & Hunter and Pioneer are trademarks of their respective owners. DIY HVAC Tools is owned and operated by Zone Air and is not affiliated with or endorsed by MRCOOL, Cooper & Hunter or Pioneer.